Sunday 25 January 2009

Gear review: Nikon 600mm f/4G VR lens


Kingfisher
Originally uploaded by DigitalHeMan


I've been the proud owner of the new Nikon 600mm f/4G VR telephoto lens now for over six months, so I thought it was about time I wrote about it on my blog. I've already posted a number of images taken with the lens, so if you look further down in my blog you will find some additional shots I have made.

First the reasoning behind my acquisition of the lens. I have owned the 200-400mm f/4G VR lens for a couple of years, and have always had a love-hate relationship with it. The reach was very nice on the DX format (equivalent to 600mm on full frame) but when I switched to the D3, I found myself missing the reach of 600mm. Of course I could use the 200-400 with the tc-14e to give 560mm, but the loss of a stop meant that I often didn't have enough light (especially in the Netherlands), and I wasn't impressed with the results.

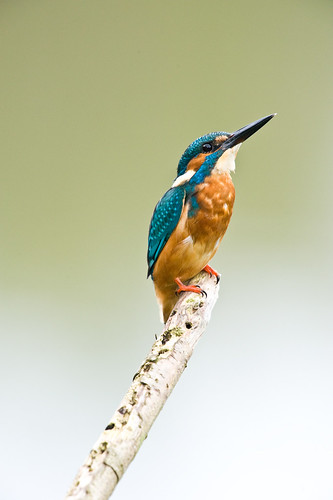
I had also set myself the target of photographing a kingfisher in 2008, and shortening my effective range by going full frame wasn't helping me achieve that goal. So in February I decided to place an order for the 600mm, shortly after it was released. I placed my order with Nivo Schweitzer in Amsterdam. They're a really friendly, knowledgeable shop, and I wish I could make more of my purchases there, but alas their prices are normally too high when compared to the ever competitive internet retailers, so I don't. But this time they were prepared to give me a good price on the lens, so I gave them my custom.

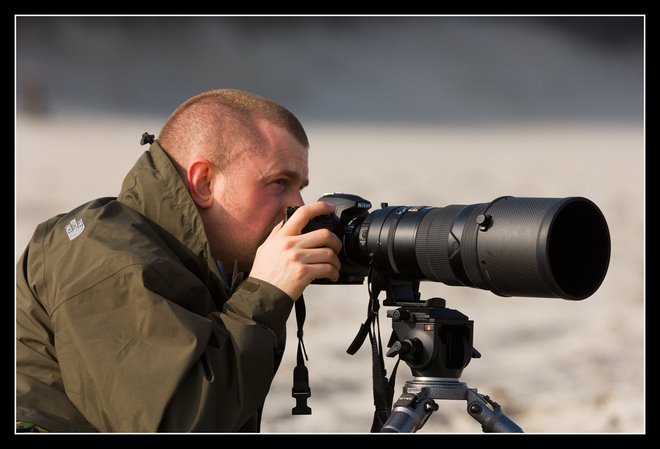
It wasn't until June that Nikon was able to deliver the lens to Nivo Schweitzer, due to the worldwide lens shortage that was caused by the Olympics, but when I finally received it I was amongst the first people in the Netherlands to get hold of it (if not the first, excluding the press). The first thing that struck me about the lens was the size. I was used to Nikon Super Teles, with my 200-400mm experiences, but the new 600 was in a class of it's own. As you can see by the attached photo, the dual lens hoods make this into a monster. (photo credit Patrick de Paepe)


Even with the lens hoods turned around in their storage position, the 600 is a big item to transport, and Nikon deliver it in a hard case. I have already discussed my choices for a new camera bag in a previous blog post. In terms of handling, though, the 600 also brings its own challenges. It's not really hand holdable. Anyone that tells you it is, is either a) Iron man, or b) lying ;) Of course it is possible to take the occasional shot from the hand, as the lens does have VR, and I can hold it for a couple of minutes before it gets tiring, but for real stability, the lens needs to be resting on something. For the 200-400 I was satisfied with a Gitzo Series 3 with Markins M20 ballhead and a Wimberley Sidekick, but for the 600 I wasn't sure that this would be stable enough, so went for the Gitzo 5540LS, together with a Manfrotto 519 fluid video head. This gives me more than enough stability, and is flexible enough for panning when needed.

It is worth noting that the standard lens foot that Nikon provides with the 600 is very 'tall', and in my opinion not really stable enough for a lens of such a size. Although I have not done any scientific testing, to me it looks like it would be a lot more prone to flex than some lower alternatives, so one of the first things I did was replace the Nikon foot with a Kirk LP-46, available from Nikonians PhotoProShop - not only is this a lot lower profile, but it also includes an integrated arca swiss plate, so it can be mounted on a full size Wimberley for example without any additional lens plate. I would recommend anyone considering the 600 to switch to this lens foot as soon as possible.

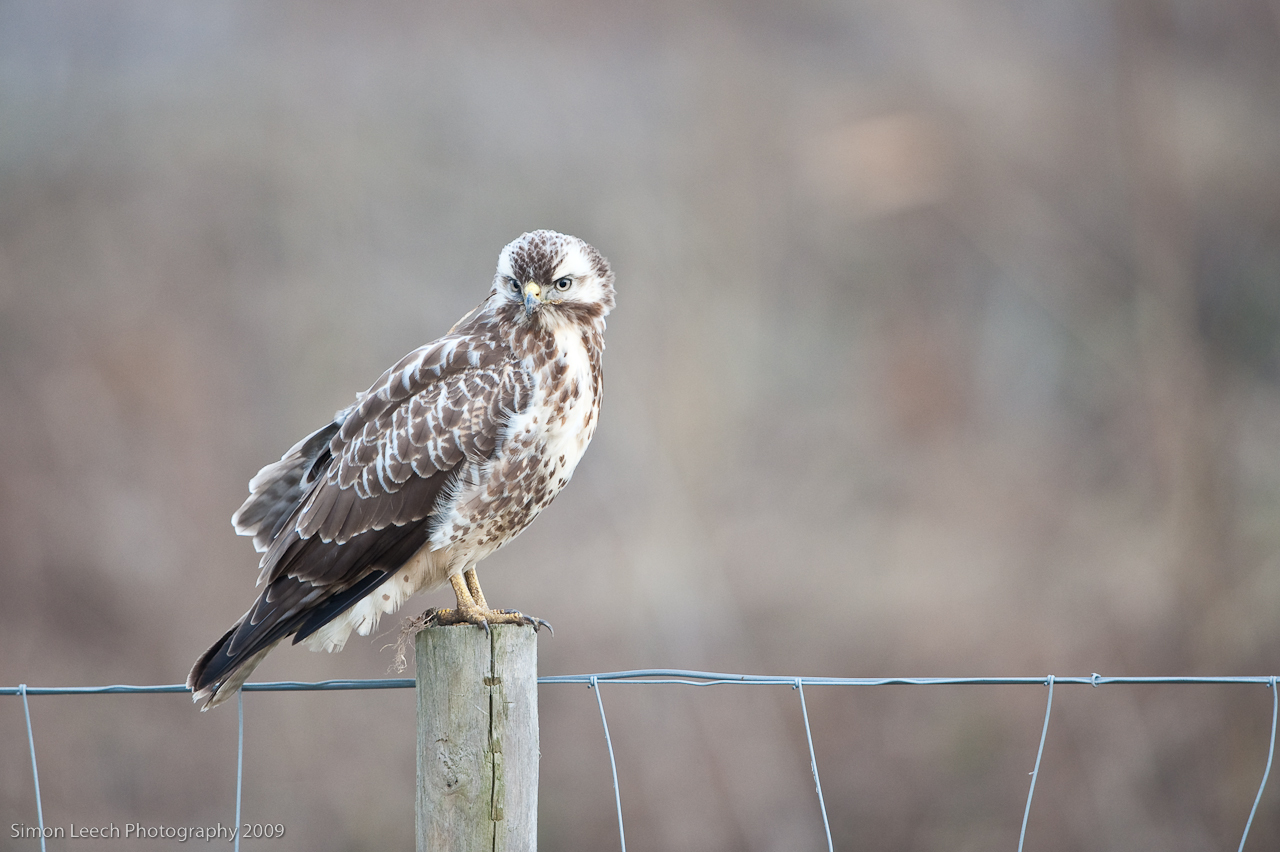
However I have found that often I am in situations where using a tripod is not practical, and then it is possible to get enough support by resting the lens on a bean bag - the shots of the kingfisher (shot from a hide) and the buzzard (shot from a car) in this blog are testament to this. (Note: often when shooting with the bean bag I tend to leave the second of the two lens hoods unmounted, simply to make the lens a little more easy to handle)


Buzzard
Originally uploaded by DigitalHeMan


Since this is a big, heavy, and not to mention expensive, lens, I decided that I would protect the lens from day one, and bought the LensCoat neoprene lens covering, to avoid any scratches to the lens and to help maintain the resale value (not that I ever intend to part with this lens). The LensCoat covers also provide me with basic camouflaging, should I wish to remain incognito when tracking a subject.

Although I was expecting a bit of a learning curve with this lens, I was pleasantly surprised that I was quickly able to adapt my long lens technique to use the lens, and was able to get good shots from day one. I am still continually impressed with the quality, sharpness, and contrast of the images that I am able to shoot with this lens. It's one of the sharpest I own, and is up there with the 200mm f/2G VR, which is a lens known for superior sharpness. Providing the shutter speed is kept to a reasonably high value, it is possible to get great shots, even when used in combination with the tc-14e teleconverter (I have even had good shots with the tc-17e). The following shot is such an example, taken with the D3, 600mm F/4VR with TC-14e, 1/800s, f/5.6, 400iso.


Deer Stag
Originally uploaded by DigitalHeMan


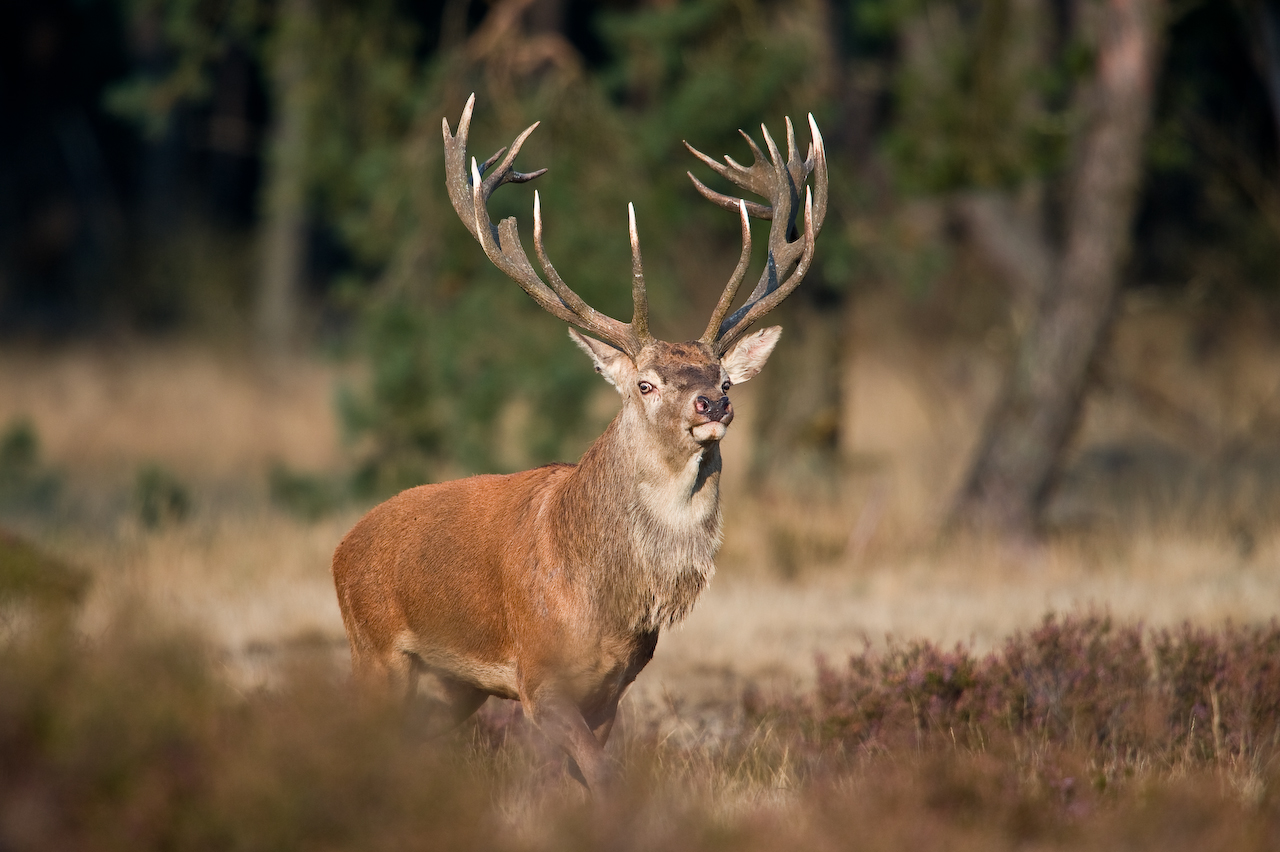
Based upon my usage of the tc-14e with the 200-400, where I had not been so impressed, I was very surprised with only a minor (hardly noticeable) loss of quality when the teleconverter was used together with the 600mm, and I find myself using this combination more and more often.

Those of you who are existing users of Nikon VR telephotos will be familiar with many of the functions on the lens - it has a focus limiter, which restricts the focusing range between 10m - infinity, instead of the normal minimum focus distance which is around 5m. It provides buttons that can be used to program a focus lock, can be used in M, A/M, and M/A focus override modes, and supports touch focusing for any last minute changes and to override the AF. It uses the familiar ring VR ON/OFF control, which seems to be the Nikon standard for fixed focal length VR lenses, as opposed to the slide switch on the 200-400.

In fact the only major change in controls over the earlier VR lenses is the VR mode switch - there is now a choice between 'Normal' and 'Tripod' mode - previously this was either 'Normal' or 'Active'. I guess Nikon engineers that a lens the size of the 600 is less likely to be used in situations that the Active mode was designed for, and instead decided to optimize the lens to work well when mounted on a tripod. In any case, this mode seems to work very well.


Buzzard
Originally uploaded by DigitalHeMan


So in summary, I am very, very pleased with the 600mm lens. Whilst it is an expensive acquisition and I accept it is not for everybody, if you can afford to buy it and are into wildlife shooting, this is the ideal lens to use for bird and animal photography. One thing to note, even at 600mm smaller birds will not fill the frame unless you are fairly close, but this can be helped by using a teleconverter. The sharpness, colors, and contrast of this lens make it a pleasure to work with, with the traditionally excellent Nikon build quality, I hope this is a lens that I will be able to continue to enjoy for many years to come.

Saturday 10 January 2009

First steps into HDR


Clipper Nelly
Originally uploaded by DigitalHeMan
According to wikipedia, HDR is "a set of techniques that allows a greater dynamic range of luminances between light and dark areas of a scene than normal digital imaging techniques. The intention of HDR is to accurately represent the wide range of intensity levels found in real scenes ranging from direct sunlight to shadows."

Digital has made the creation of HDR images a lot easier, since many cameras now include an auto bracketing mode, which allows the photographer to make many images of the scene using different exposures. It is not uncommon for an HDR photographer to blend together 3 or even 5 images to create an image that is able to give good representation of both the light and dark areas of the image.

I've always been a bit of an opponent to HDR photography, for no other reason that I believe(d) that it should be possible to get an aesthetically pleasing shot without the need for excessive post processing in digital imaging software afterwards. Additionally, many of the early users of HDR techniques maybe didn't understand what they were doing, so ended up creating unrealistic, over the top representations of a scene, giving the whole HDR scene a bad name (at least in my opinion).

However, a friend of mine, Philip, who goes by the name of milliped on Flickr, has been a long time user of HDR, and the results he comes out with aren't that bad (in fact, they're mostly very impressive!). Recently we were out together on a recent photo trip around Rotterdam harbour. It was a pretty grey day, and 'normal' photos were coming out a bit dull, so I decided to give HDR a go.....

Quack Quack

As mentioned above, modern cameras make HDR photography (or at least the image capture part) very easy, and all I really needed to do was set my Nikon D3 to 5 shot bracketing, and expose 5 shots, each at a different exposure either side of the original exposure reading. With earlier versions of HDR software it has always been necessary to use a tripod to ensure that the images actually line up once they are combined in the digital darkroom, but whilst discussing the latest version of Photomatix Pro with Philip in the car on the way to Rotterdam, he informed me that it was now able to automatically able to realign slight deviations in image alignment, so, combined with the high frames per second speeds of the D3, I figured I could get away without using a tripod.

I chose to use Aperture Priority Mode on the camera (which I typically do for most daytime photography) and exposed at -2, -1, 0, 1, and 2EV deviation on the base exposure reading. This left me with 5 shots of each scene, and when I reached home, all I would need to do would be to combine the images in Photomatix, and I would be able to create my HDR image.

I have been a long time follower of Trey Ratcliffe's Stuck in Customs blog, and I knew he had an excellent tutorial on how to get started, so I downloaded a copy of Photomatix, paid my license fee, and read the tutorial. (Incidentally you can get a discount on the purchase of Photomatix if you visit Trey's website and use the discount code he has there)

Railway and Fence

It turns out creating the HDR image is a lot easier than I had thought. Once you open Photomatix, you choose 'Generate HDR image' from the menu, and Photomatix allows you to choose the images you want to combine. Clicking OK takes you to an options screen - normal usage seems to be to leave everything unchecked, although I enabled the 'Align Source Images' option, and chose Adobe RGB as my colorspace.

The generation of the HDR image can take a while, especially on a slower computer, and once it has been generated won't look that impressive. The next step however is to click on 'Tone Mapping' in the main menu, which will start the main work to get the HDR looking good.

The options available here are numerous, and Trey's tutorial provides a lot more detail on how to use them than I will write here, but suffice to say, you can have a lot of fun playing around. So far I have not needed to do much more than up the strength to between 80 and 100, increase saturation a bit to maybe ±70, and adjust my white and black points to improve exposure. Sometimes I will play with luminosity, or adjust smoothing to High or Very High, and from time to time the other settings may be changed also, but there is no real right or wrong way of going about it - just play until you find a mix that works for you!

Once the image looks good in the preview window, all that is left to do is click on process, and choose to save the image. This can then be further improved in Photoshop or Lightroom, although typically I find that not much more needs to be done.

In order to show the improvement HDR can make to an image, I have posted two images. The first one shows the train signal with the standard Nikon matrix metering exposure choice. As you can see, it was a pretty grey, uninteresting day weather wise. The second shot shows the same train signal, but after having gone through the tone mapping procedure in Photomatix. Of course, everyone has their own opinion as to which is the better image, however I think the HDR treatment in this case has created a much more dynamic, more intriguing to look at image.


Train signal
Originally uploaded by DigitalHeMan

So after making a couple of shots and converting them back home on the computer, my impression of HDR imaging has changed. Although I won't be using it for every shot I make from now on, I can definitely see uses for it, and will be keeping it in my toolbox as one more tool to use to improve the results I am able to get out of my camera.

(As a side note, all shots in this blog entry, with the exception of the first shot of the Clipper Nelly, were taken using the Nikkor 16mm f/2.8D Fisheye lens. One of the lenses I thought I would miss most when moving over from DX format was the 10.5mm fisheye, but it seems the 16mm is able to offer the same excellent images as his younger DX brother. This was my first major outing with the lens, and I think I will be using it a lot more in the future.)

Saturday 3 January 2009

Gear Review: Lowepro Super Trekker AWII


When I got back into (nature) photography a couple of years ago, I realised that the correct camera bag was going to play a pretty important role in whether or not I was going to be able to carry my gear around comfortably. Previously I had owned various camera bags, and all had been pretty useful for the task they were bought for. But when I purchased the Nikon 200-400mm f/4G VR, I accepted that having a shoulder bag was no longer feasible, primarily because the lens wouldn't fit inside. So I acquired the Lowepro Photo Trekker AWII on the recommendation of fellow photographers, and was very happy with the bag. The Photo Trekker is a large size camera rucksack, and offers enough capacity and customisation to be able to be loaded with a couple of bodies, the 200-400, 70-200, and a few other additional lenses as required. The integrated harness meant that it could be adjusted to fit the photographer's back to give a comfortable fit, and the SlipLock connectors on the side meant I could expand the bag by adding Lowepro lens cases for my smaller lenses.

However, when I purchased the Nikon 600mm f/4G VR I had a problem. The lens is delivered in an aluminum case, which, whilst giving good protection to the lens, is not practical to carry for long distances, and does not offer any additional space for the camera body, let alone any additional lenses. And with the word 'Nikon' emblazoned on the front, draws attention to what you have inside. So I evaluated my options......

First thing I did was try to get the 600mm inside the Photo Trekker. Admittedly it did work, as you can see from the accompanying photograph, however this required the removal of most of the internal dividers. In addition to the 600mm I could also carry the pro body, a couple of teleconverters, a wide angle zoom, and a small size beanbag. But the biggest disadvantage was that I was unable to carry the lens with the body mounted, and this meant I would lose time in the field getting it set up, and introduce the possibility of dust into the camera sensor chamber. So with Christmas around the corner, I asked Father Christmas what my options were. She looked at the Lowepro website and told me there were two ways of solving the problem.

So a couple of weeks ago I went along with Father Christmas to Kamera Express in Capelle an der Ijssel with the intention of buying the Lens Trekker 600 AWII. This is a revised bag that Lowepro recently announced at Photokina 2008, and has been specifically designed for use by photographers who wish to carry the 600mm with a body attached. I looked at it, and was impressed with the usual Lowepro quality of manufacture, but quickly realised it didn't really solve the problem. Sure it enabled me to comfortably carry the 600mm with the body attached, but there was limited room for anything else. It didn't really win me anything in addition to the Photo Trekker that I was already using.

The second option that Santa had suggested was the Lowepro Super Trekker AWII. This is basically a larger version of the Photo Trekker that I already had, but in this case size does matter, and I would have more than enough space for all I wished to carry, so I chose for this bag instead.

The first difference between the two bags is that the internal dimensions of the Super Trekker (14.6Wx6.5Dx25.6H inches/37Wx16.5Dx65H cm) are much bigger than the Photo Trekker (12Wx5.9Dx19.1H inches/30.4Wx15Dx48.5H cm). 

Visually they are both similar externally, although the Super Trekker does have additional pouches that connect to each side of the bag, using the Slip Lock system. One is padded so can be used to carry a lens, whereas the other is not, so is more useful for chargers or a water bottle. 

One of the nice features with the Lowepro range of bags is that they provide you with enough internal dividers to fulfill even the most imaginative of configurations. Some are stiffer than others and can be used as the base dividers, and others are softer and can be bent as needed. 

The first thing I did was remove all of the dividers to make sure that I would be able to fit the 600mm in as desired, which was not a problem. There was more than enough space, and I could even fit a teleconverter if needed. It was still not possible to have the lens hoods attached in the shooting position, but I accepted long ago that that would end up being a very large bag if it were possible...... 

Theoretically there would also be enough space to add a second super telephoto, such as the 200-400mm f/4G VR or the 200mm f/2G VR, but that would lend to a very heavy pack. But for reference I took a shot with the 600mm next to the 200-400, to show the possibilities, and there are certainly enough dividers to make it possible.

After playing around with the dividers for a while, I finally came up with a configuration that allowed me to pack all the gear I needed for an 'average' trip, (D3, 600mm, 70-200mm, teleconverters, 24-70mm, 17-35mm, D300 etc) with enough additional space for other lenses if they were needed. This configuration also has enough space for a bean bag to sit on top of the 600mm, and my Gitzo sits outside on the Trekker Tripod Mount. To see exactly what lens is located where, click through to the image with annotations at flickr

Overall, I am happy with the Super Trekker - it is comfortable to carry, has enough configuration options to change as my lens collection grows or shrinks, or when I want to carry less gear, and is built with the normal Lowepro quality. So far I have taken it out a couple of times, and have comfortably carried it for a couple of kilometers without feeling the weight.

Some additional features worthy of a mention:

- Adjustable waist band allows the weight to be split across the shoulders and the waist, giving a more comfortable carrying position
- Internal metal frame
- DayPack, which can be clipped to the outside of the Super Trekker, allowing for further carrying options, as well as the possibility to detach and carry as a separate bag for smaller trips
- Trekker Tripod Mount for carrying a tripod. Included compression straps allow for stability of the tripod when mounted vertically. I am able to mount my 5 series Gitzo together with Manfrotto video head without any problems
- Water resistant 600D Endura nylon and YKK zippers
- All Weather Cover hidden in the base which can be pulled out to provide even better protection against the elements when needed (although since the bag is made of Endura nylon, the bag is well enough constructed to do without this in most weathers)
- Zip cover to cover back harness, to make for easier transporting
 
In conclusion, this bag is all I need it to be. Although it is not as easy to take on a plane as something like a ThinkTank Airport International, it is definitely suited to the occasions when I need to get the majority of my gear on my back, and hike with it to my final destination, and is pretty much the only solution available when I need to take the 600mm.....

Thursday 1 January 2009

Happy New Year 2009


Robin Red Breast
Originally uploaded by DigitalHeMan
Happy New Year to all my readers..... I hope 2009 brings you and your family all you want, both in your professional and personal life.

I seem to remember writing a resolution on my blog 365 days ago promising to write more blog posts in 2008. Well, with only 11 under the belt that didn't really happen as planned, so I'll try and improve that for 2009.

I have a couple of ideas for blog posts, and hope to be able to write blogs on the following subjects at the start of 2009:

- Gear review: Lowepro Super Trekker AWII
- Book review: Wedding Photography by Mark Cleghorn
- Book review: Annie Leibovitz at Work by Annie Leibovitz
- Gear review: Nikon 600mm f/4G VR lens
- Gear review: Nikon 200mm f/2G VR lens

So now I've written that to the web, I have to do it..... stay tuned!

For now, here's a shot of a robin I made in my parents' garden over Christmas. This was taken at iso2200 with the D3, using the 600mm. Still fairly heavily cropped, and could have really done with a bit more focal length on this one.