
Digital has made the creation of HDR images a lot easier, since many cameras now include an auto bracketing mode, which allows the photographer to make many images of the scene using different exposures. It is not uncommon for an HDR photographer to blend together 3 or even 5 images to create an image that is able to give good representation of both the light and dark areas of the image.
I've always been a bit of an opponent to HDR photography, for no other reason that I believe(d) that it should be possible to get an aesthetically pleasing shot without the need for excessive post processing in digital imaging software afterwards. Additionally, many of the early users of HDR techniques maybe didn't understand what they were doing, so ended up creating unrealistic, over the top representations of a scene, giving the whole HDR scene a bad name (at least in my opinion).
However, a friend of mine, Philip, who goes by the name of milliped on Flickr, has been a long time user of HDR, and the results he comes out with aren't that bad (in fact, they're mostly very impressive!). Recently we were out together on a recent photo trip around Rotterdam harbour. It was a pretty grey day, and 'normal' photos were coming out a bit dull, so I decided to give HDR a go.....
As mentioned above, modern cameras make HDR photography (or at least the image capture part) very easy, and all I really needed to do was set my Nikon D3 to 5 shot bracketing, and expose 5 shots, each at a different exposure either side of the original exposure reading. With earlier versions of HDR software it has always been necessary to use a tripod to ensure that the images actually line up once they are combined in the digital darkroom, but whilst discussing the latest version of Photomatix Pro with Philip in the car on the way to Rotterdam, he informed me that it was now able to automatically able to realign slight deviations in image alignment, so, combined with the high frames per second speeds of the D3, I figured I could get away without using a tripod.
I chose to use Aperture Priority Mode on the camera (which I typically do for most daytime photography) and exposed at -2, -1, 0, 1, and 2EV deviation on the base exposure reading. This left me with 5 shots of each scene, and when I reached home, all I would need to do would be to combine the images in Photomatix, and I would be able to create my HDR image.
I have been a long time follower of Trey Ratcliffe's Stuck in Customs blog, and I knew he had an excellent tutorial on how to get started, so I downloaded a copy of Photomatix, paid my license fee, and read the tutorial. (Incidentally you can get a discount on the purchase of Photomatix if you visit Trey's website and use the discount code he has there)
It turns out creating the HDR image is a lot easier than I had thought. Once you open Photomatix, you choose 'Generate HDR image' from the menu, and Photomatix allows you to choose the images you want to combine. Clicking OK takes you to an options screen - normal usage seems to be to leave everything unchecked, although I enabled the 'Align Source Images' option, and chose Adobe RGB as my colorspace.
The generation of the HDR image can take a while, especially on a slower computer, and once it has been generated won't look that impressive. The next step however is to click on 'Tone Mapping' in the main menu, which will start the main work to get the HDR looking good.
The options available here are numerous, and Trey's tutorial provides a lot more detail on how to use them than I will write here, but suffice to say, you can have a lot of fun playing around. So far I have not needed to do much more than up the strength to between 80 and 100, increase saturation a bit to maybe ±70, and adjust my white and black points to improve exposure. Sometimes I will play with luminosity, or adjust smoothing to High or Very High, and from time to time the other settings may be changed also, but there is no real right or wrong way of going about it - just play until you find a mix that works for you!
Once the image looks good in the preview window, all that is left to do is click on process, and choose to save the image. This can then be further improved in Photoshop or Lightroom, although typically I find that not much more needs to be done.


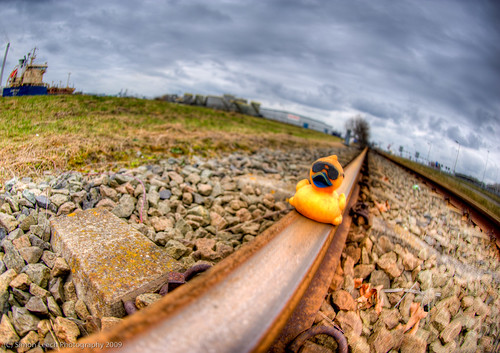
In order to show the improvement HDR can make to an image, I have posted two images. The first one shows the train signal with the standard Nikon matrix metering exposure choice. As you can see, it was a pretty grey, uninteresting day weather wise. The second shot shows the same train signal, but after having gone through the tone mapping procedure in Photomatix. Of course, everyone has their own opinion as to which is the better image, however I think the HDR treatment in this case has created a much more dynamic, more intriguing to look at image.
So after making a couple of shots and converting them back home on the computer, my impression of HDR imaging has changed. Although I won't be using it for every shot I make from now on, I can definitely see uses for it, and will be keeping it in my toolbox as one more tool to use to improve the results I am able to get out of my camera.
(As a side note, all shots in this blog entry, with the exception of the first shot of the Clipper Nelly, were taken using the Nikkor 16mm f/2.8D Fisheye lens. One of the lenses I thought I would miss most when moving over from DX format was the 10.5mm fisheye, but it seems the 16mm is able to offer the same excellent images as his younger DX brother. This was my first major outing with the lens, and I think I will be using it a lot more in the future.)


3 comments:
Some nice shots there mate ;)
Hi there again buddy...
Yea again nice work and great that you are so open in telling us the whole storry, great job and keep on this way.
Pat
Some lovely photos on here, especially the Kingfishers, keep it up!!
Post a Comment