
Up until now my post processing workflow has been relatively disorganised - I shoot everything in RAW to give me the most flexibility when back behind the computer, but how I process the NEFs has really depended on my mood. Typically I would use Adobe Bridge as my 'organiser', then tag the photos with red if I decide after looking at the preview that I would like to do some more work on the image. Once I have done a quick review of the images, I would open up each red tagged shot individually and use Adobe ACR to make fine adjustments to the exposure, and then open the shot in Photoshop to do the real hard work, using layers to play with hue, saturation, levels, curves, and sharpening until I have the end result I am happy with.
However, for 95% of the images, Photoshop has really been a bit of overkill, since I am only using the basic functionalities, and basically just an expensive memory hog.....
Enter Adobe Lightroom......
Lightroom has been designed from the ground up by Adobe as a photographer's workflow replacement, and has been labelled by many as being Adobe's response to Apple's Aperture tool, which has a very similar set of functionalities.
I downloaded an early beta copy of LR when it was first released and only available for the Mac, and quickly dismissed it - it didn't seem logical, and forced me to import all my photos to a separate library before I could work on them (which effectively doubled the storage space I needed for image storage). After playing with it for 30 minutes or so it found its way to my dustbin.
However, on Patrick's recommendation I took another look at the final release version, and was pleasantly suprised. In between the previous release I had tried, and this release, Adobe had acquired Pixmantec, the makers of RawShooter, a very flexible RAW workflow tool for the PC, and have integrated many of the features into Lightroom, making it a very flexible tool.
There are five main parts to the product: Library, Develop, Slideshow, Print, and Web. The idea behind this is first of all the user 'imports' his newly uploaded files into LR's Library (in this release however this is virtual - the images remain in their intial location, and information about the images is loaded into LR's database), then the user organises them, tags them, labels them, etc, and moves onto the next stage, Develop.
There are a number of ways an image can be developed - firstly, using the 'Quick Develop', LR will assign what it feels are the best automatic exposure settings to the image, and although this is still using Adobe Camera RAW, I have to say these settings are much more accurate than what I have experienced previously with ACR. You can either leave it at that (which I doubt I would do much), or you can fine tune the development stages, by altering contrast, saturation, hue, exposure, curves, and a number of other settings. The curve alterations has changed from Photoshop, and instead of working directly on the curve, you adjust the settings by using a number of slide bars below the graphical curve, and although this takes a bit of getting used to, in my opinion it is a lot easier to work with it like this.
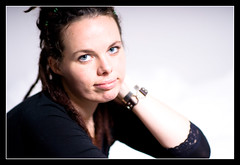
One welcome addition to the develop stage are a number of presets, including various toning options (cyanotype, sepia), b+w conversions, and something called 'direct positive'. From what I can work out, this adds around +1.15EV to the exposure, and plays around with the contrast to give a very striking image which works especially well for fashion type images. Of course one can take this preset effect and adjust it to one's own preference. See the attached photo of Heleen for an example of how this can work
Within the Develop stage you also have the ability to do split toning, which basically gives the possibility of making toned images to your own preferences, and not just relying on the preconfigured Sepia and Cyanotype examples. Again some examples of these split tones can be seen in my Flickr photostream. Develop also supports the export of your images, and these can be automatically converted to jpg (or another format) images, assigned a colour profile, and then opened up in Photoshop or saved to disk. It is also possible to associate the export action with a Photoshop droplet, which could then, for example, add a custom frame around the edge of each image (the ability to add borders is something I feel is sadly missing from the product).
Once the developing has taken place, the next step is to display the images, and LR supports this with the Slideshow function, which allows you to show selected images as an onscreen slideshow. I really like this function, as you are not restricted to a single directory as the source for the slide show, but can instead set up a slide show based upon tags or labels, and add music (from directly within an iTunes playlist for example) and custom fade/slide progressions to the show. Ideal to show to a prospective client. The slideshow can also be exported as a pdf document, although of course the music does not get exported along with the pdf.
The Print stage allows you to set up an image for printing, and is something that I doubt I will do, since I still send away all my images to a pro lab for printing, but it seems a fairly flexible way of sending the image to a local printer.
The final stage is Web, and here Adobe has expanded the web templates from within Photoshop to give around 20 html and flash based web site designs. These can be customised to show your name, exposure details, and the colour schemes etc can be adjusted to your own personal tastes. It is definitely a very easy way to publish the images to the web, and can even upload to an ftp site automatically.
Overall, for a v1.0 Adobe has done a very good job in creating a market ready product, and I feel they have learnt from some of the weaknesses that Apple Aperture has. It uses many of the good Photographer's features from Photoshop, and expands on them to make them more friendly to the image maker. I am still discovering much of the product, but can already see that it will have a place in my workflow from now on. I will still use Photoshop from time to time, for example if I need to do cloning in an image, or play with some of the more advanced filters available, but for most of my standard stuff Lightroom will do the job.
It is available as a free 30 day trial from Adobe, and I would encourage you all to give it a go and let me know how you feel about it.....


3 comments:
Interesting.
Do you know if you can do basic retouching with LR? Like getting rid of spots on the skin and stuff like that?
Yes, there are two tools: one is the red eye removal tool, and the other is the 'remove spots' tool, which can be used in either heal or clone mode to get rid of dust spots, or skin blemishes etc.
It's not as universal as the equivalent Photoshop tools, but looks like it will do the job in many cases.
Thanks.
Downloaded it and love it.
Post a Comment