One of our friends gave us a muscari plant recently, and it also burst into bloom this weekend. Whilst it hasn't produced the deep blue blooms that are often associated with this particular flower, it nevertheless has given me a perfect subject to play around with my camera, and some of the results can be seen in my flickr photostream.
I am lucky to have managed to obtain a good secondhand copy of the Nikon 70-180mm F/4.5-5.6 Micro zoom before they either disappear from the face of the earth, or begin to command insane prices on ebay (Nikon recently discontinued this, their only Micro zoom, leaving only fixed focal length macros in their collection) and the flexibility of the zoom makes this an ideal lens for flower photography, and allows the photographer to get in much closer than just a bloom or a petal.
There are a number of choices to make with macro photography. Firstly the light source - should it be artificial, or available light? When shooting in the great outdoors, the subject and it's surroundings often dictate this, since any subject movement close up is greatly amplified, and needs a high shutter speed in order to freeze it, which is not always possible, so flash gives a number of advantages.
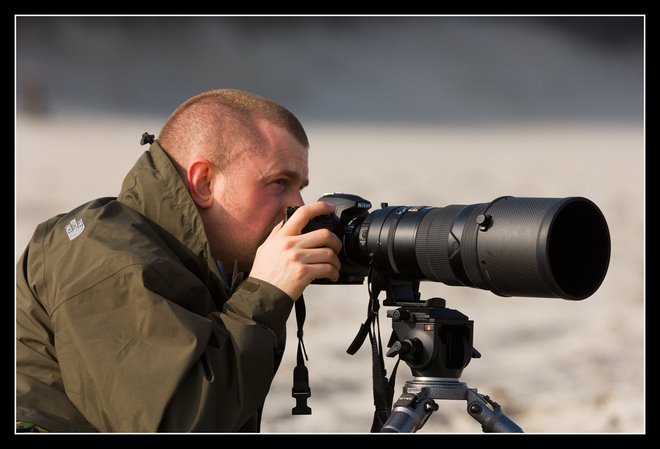
When using flash for macro, a close up flash kit such as the Nikon SB-R1(C1) is ideal. The top shot accompanying this blog was taken with the SB-R1, and two SB-R200 light sources either side of the lens. Due to the size of the muscari blooms, I was also shooting with the PK-13 (27,5mm) extension tube, and the Nikon 6T close up lens, and I wanted to get the in focus blooms to stand out a bit from the background. Now one of the nice things with the SB-R1 kit is that light fall off is pretty quick, so you end up with a nice black background, but in this case it wasn't happening initially, as the ambient light was too high, so I stepped the shutter speed up to 1/250s to aid the separation. (this also works inversely - by using slow shutter sync you can also balance the ambient light to give the background detail as well)
However, such a close up flash kit isn't always necessary. Today I was at Keukenhof, where wielding the Sb-R1 around would have been impractical, so instead I worked with the SB-800, but took it off camera and used the SC-17 connecting cable so that I could control where the light was falling on the subject. Works just as well, and with Nikon's advanced TTL flash, exposures were spot on.
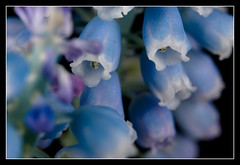
The second shot was taken with ambient light. This required a longer exposure to balance the exposure, and I ended up shooting at 1/3s. This gave the nice effect that the background (a white wall) was also exposed well, and I felt this gave the photo a dreamy quality. Of course outside this shot wouldn't have been possible, as even the slightest breeze would have left the picture unsharp, but there is nothing wrong with shooting specimens in a controlled environment inside (assuming of course you haven't taken the flowers from the wild with the sole intention of photographing them ;)
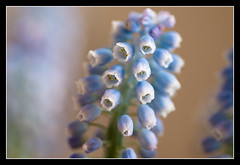
Another choice to be made with macro photography is the aperture to be used. This will have a dramatic effect on how much of the picture will end up being in focus, since the depth of field in macro photography is greatly reduced. Take for example the two shots accompagnying this blog - the first was shot at f/16, leaving a fair amount of the bloom in focus, whereas the second one was shot at f/5.6, leaving very few of the blooms sharp. In my experience, the more 'artistic' shots will use a lower aperture, whereas the 'documentary' shots will be shot at higher apertures.
In the age of digital SLR photography, shooting higher apertures brings its own challenges in the form of dust bunnies. It is an unfortunate fact that sensors do collect dust over time, due to their static charge, and regardless of how carefully lenses are changed, dust will end up on the sensor. You can check for dust on your sensor by shooting a white wall at f/16 or higher, and you will probably be suprised by the results. During 'normal' photography, you are less likely to notice the dust since (at least in my case) you don't use the higher apertures so often, but since macro photography means you are more likely to, this either means cleaning the sensor before a macro session, or using spot removal in Photoshop or Lightroom to try and remove the spots in post processing.
Needless to say, the use of a sturdy tripod and a cable release are imperative in order to get sharp results, but I'll leave that for another day.......